Lifes Tough Get a Helmet: Embroidery Design Review
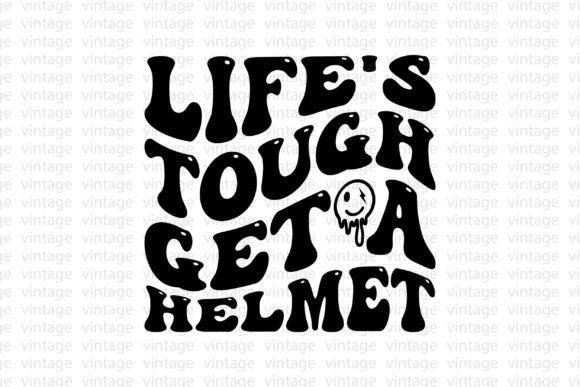
Some designs show up and instantly make you think about who is going to wear it, where it will live, and what kind of reaction it will pull from a customer browsing a handmade shop. The Lifes Tough Get a Helmet graphic lands in that space quickly. It carries a retro, wavy, groovy personality that feels equal parts nostalgic and cheeky. The moment I opened the file, I could already picture it stitched out on a heavyweight sweatshirt, sitting on a rack at a craft fair, and catching the eye of someone who needed exactly that nudge of attitude.
What struck me first was the rhythm of the lettering. The wavy baseline treatment gives the phrase motion without making it chaotic. For embroidery designers and small business owners who sell finished products, that kind of movement can be a double-edged sword. Too much distortion and the stitching turns muddy. Too little and the groovy vibe collapses into something stiff. This design holds the line well. The curves feel intentional, not forced, and the overall shape reads clearly even at a glance. That matters when you are thinking about machine embroidery design conversion and how the final stitch-out will present on fabric.
I want to be upfront about something important. The product listing clearly states this is a digital download with EPS and SVG file formats. Those are vector files, not embroidery-specific formats like PES, DST, or EXP. What that means for an embroidery designer or a craft business owner is that you are getting clean, scalable artwork that can serve as the foundation for digitizing. You will need to bring this into your digitizing software, map out the stitch types, assign densities, and build the embroidery file yourself. For experienced digitizers, that is actually a plus. You maintain full control over how the design translates to thread. For beginners, you should know this is not a stitch-ready file you can load onto your machine immediately.
First Look at the Retro Groove
The mood of Lifes Tough Get a Helmet is unapologetically playful. The wavy, groovy lettering pulls from a late-sixties and seventies aesthetic that has been cycling back through fashion and handmade trends for a few years now. What makes this version work for embroidery is that the letterforms are not overly thin. Hairline strokes are the enemy of clean satin stitching, and thankfully this design avoids that trap. The characters have enough width to hold a satin stitch or a well-placed fill stitch without collapsing under dense thread coverage.
The phrase itself carries a wink. It is the kind of saying that makes someone smile and nod. I think about a customer at a boutique picking up a tote bag, reading the words, and immediately connecting with the sentiment. That emotional hook is valuable. When you are building a product line for Etsy or a small shop, you want designs that spark a reaction in the first two seconds. Lifes Tough Get a Helmet does that. It is not just decoration. It is a tiny statement piece.
Real Project Scenario: The Sweatshirt That Sells Itself
Let me walk you through a real scenario I kept imagining while reviewing this graphic. I have a stack of heavyweight cotton-blend sweatshirts in neutral tones waiting for the right design. I pulled up the Lifes Tough Get a Helmet file, converted the vector art into a digitized embroidery file, and ran a test stitch on a scrap of fleece-backed fabric. The retro curves translated beautifully. I used a soft cream thread on a charcoal sweatshirt, and the contrast was sharp without being harsh. The wavy lettering gave the chest placement some movement, so the garment did not feel like a flat, blocky print. It had personality stitched right into the fabric.
I pictured this sweatshirt listed on Etsy, photographed in natural light, styled with vintage denim. The kind of product that attracts comments and saves. For a craft business owner preparing inventory for a fall market or holiday push, this design on a sweatshirt, a canvas tote, or even a structured cap would stand out. The retro vibe taps into a broad audience. It works for younger buyers who love the throwback aesthetic and for older customers who remember the original era fondly. That cross-generational reach is rare and worth paying attention to.
Where the Design Performs Best
After working with the artwork and thinking through real embroidery applications, I see several strong use cases for Lifes Tough Get a Helmet. Here is where I would confidently place it in a handmade product lineup.
- Sweatshirts and hoodies. The front chest or upper back placement gives the wavy lettering room to breathe. The design reads well at around four to five inches wide, which fits standard hoop sizes comfortably.
- Canvas tote bags. A centered placement on a sturdy tote creates an instant gift item. The groovy lettering feels at home on natural cotton textures.
- Embroidered patches. Digitized with a dense border and backed with felt or twill, this design makes a patch that people will sew onto jean jackets, backpacks, and hats.
- Aprons and kitchen towels. For a quirky boutique kitchen line, this phrase stitched onto a linen apron or a flour-sack towel adds unexpected humor.
- Pillow covers. A decorative throw pillow with this design in a living room or reading nook becomes a conversation starter.
- Custom apparel for small brands. Boutiques, salons, or coffee shops looking for branded merchandise with personality could use this as a playful uniform piece.
The common thread across all these applications is that the fabric surface is relatively stable and the placement area is generous. The design wants space. It does not thrive when crammed into a tiny corner or forced onto a highly curved surface without careful adjustment.
When to Proceed Carefully
Every design has its sensitive spots, and Lifes Tough Get a Helmet is no exception. The wavy baseline, while charming, demands attention during digitizing and stitch-out. Here are the situations where I would pause and test thoroughly before committing to a production run.
Small hoop sizes are the first challenge. If you try to shrink this design down to fit a two-by-two-inch patch, the wavy curves in the lettering will likely lose clarity. The retro shape relies on visible flow, and compressing it too far turns the waves into indistinct bumps. I recommend keeping the design at least three and a half inches wide for embroidery. Smaller than that, and you risk losing the very thing that makes the design special.
Stretchy fabrics like lightweight jersey or performance blends can distort the wavy lettering during wear. The motion of the body pulling the fabric can twist the already-curved text into something unintended. If you are stitching onto a t-shirt made of thin, stretchy cotton, use a sturdy cut-away stabilizer and consider adding a light backing layer to reduce movement. The same goes for highly textured fabrics like terry cloth or waffle weave. The texture fights with the curved lettering and can make the edges look fuzzy even with clean stitching.
Dark fabrics require extra contrast planning. The groovy aesthetic often leans into warm, earthy, or muted tones, but those can get lost on a black or deep navy background. Test your thread color choices on the actual fabric before committing. A design that looks bold on a white mockup might disappear on a dark garment if the thread tones are too close to the fabric color.
Curved surfaces like caps and hat fronts need careful hooping and digitizing adjustments. The wavy text can warp further when pulled across the curved profile of a baseball cap. If you want to use this design on headwear, consider straightening the baseline slightly or splitting the phrase into two lines to reduce the horizontal stretch across the cap's curve.
Stitching Personality and Visual Appeal
What makes Lifes Tough Get a Helmet worth the effort of digitizing is the finished look. When stitched correctly, the wavy lettering creates a rhythm that static text simply cannot match. The eye follows the curve, bounces slightly, and lands on the message. That visual engagement is what separates a forgettable product from one that sticks in a buyer's memory.
For handmade product sellers, design personality directly affects perceived value. A customer scrolling through dozens of embroidered sweatshirts will pause on the one that feels different. The retro, groovy shape of this design does that. It signals that the maker thought about more than just slapping a phrase onto a shirt. The wavy treatment feels deliberate, and deliberate choices build customer trust.
I also think about how this design photographs. The curves catch light differently across the thread surface, creating subtle highlights that flat text does not produce. In a product listing photo, that added dimension can make the difference between a scroll-past and a click. For Etsy sellers and small shop owners, the quality of the design in listing photos directly impacts conversion. A design with visual texture and movement earns its keep.
Digitizing Considerations for Clean Results
Since you are working from vector files, the digitizing stage is where the design either succeeds or fails. The EPS and SVG formats provide clean paths, which is a great starting point. But the embroidery outcome depends entirely on how you translate those paths into stitches. Here are the notes I would give any embroidery designer preparing to stitch out Lifes Tough Get a Helmet.
First, choose your stitch type wisely. The lettering body works well with a smooth satin stitch for a polished, slightly glossy finish. If you want a more textured, vintage look, a light fill stitch with a subtle pattern can give the design a handcrafted feel. Avoid overly dense fills on thin fabrics, as the wavy curves can pucker under too much thread tension.
Second, check the stitch direction. The angle of your satin stitches should follow the flow of the curves. If the stitch direction fights the shape of the lettering, the waves will look jagged rather than smooth. Run a test on scrap fabric and examine the result under good lighting. Look for any spots where the curve breaks or the thread coverage thins out.
Third, thread color selection matters more than it seems. The retro mood calls for warm, slightly muted palettes. Mustard yellow, burnt orange, olive green, chocolate brown, and cream all fit the groovy vibe. But do not lock yourself into a single palette. Test the design in a crisp white on a pastel background for a fresh, modern take. Or try metallic thread on a dark base for a boutique look. The design is versatile enough to handle both directions.
Fourth, always test in black and white. A quick grayscale mockup or a single-color test stitch reveals whether the design holds up without color to carry it. Strong designs read clearly in monochrome. If the wavy lettering gets lost in a black and white test, revisit your stitch density and contrast levels before moving to production.
Using the Design for Commercial Projects
Many embroidery designers and craft business owners want to know whether a design can be used on products they sell. The Lifes Tough Get a Helmet graphic comes as a digital download with EPS and SVG files. Before you sell finished items featuring this design, you need to confirm the licensing terms that accompany the files. The product description does not specify personal versus commercial use rights, so reach out to the seller or check the included documentation carefully. Selling embroidered sweatshirts, tote bags, patches, or any finished product with this design without proper commercial clearance could create legal headaches you do not want.
For digital product sellers who create embroidery design packs, note that you cannot simply convert this vector file into an embroidery format and resell it as your own embroidery design unless the license explicitly permits derivative commercial distribution. The original artwork belongs to the creator. Respect the licensing boundaries, and your business stays clean and professional.
Giftability and Customer Reaction
One angle I always consider when reviewing a design for a handmade shop is giftability. Does this design make sense on a product someone would give to a friend, a family member, or a coworker? The answer with Lifes Tough Get a Helmet is a confident yes, with the right audience in mind. It is perfect for a birthday gift with a sense of humor, a graduation present with a wink, or a just-because pick-me-up for someone going through a rough patch. The phrase is uplifting without being saccharine, and that balance is hard to find.
I can also see this design working beautifully on baby items, with a twist. A tiny onesie with this phrase stitched in soft pastel thread gets a laugh at a baby shower. A toddler sweatshirt with the retro lettering feels playful and protective at the same time. The helmet metaphor works across ages, and that versatility opens up multiple product categories for a small business.
Final Practical Notes from the Worktable
Before you commit to a full production run, do your homework on the technical side. Test the digitized version on the exact fabric you plan to use. Check hoop size compatibility with your machine. Review stitch density on a sample piece and wash it to see how the design holds up after laundering. Inspect the small inner curves of the wavy letters for any thread breaks or gaps. A design that looks flawless on screen can reveal weaknesses after a single wash cycle, and your customers will notice.
Use proper stabilizer for the fabric type. On stretchy knits, a cut-away stabilizer prevents long-term distortion. On woven fabrics like canvas or linen, a tear-away stabilizer keeps the back clean. Do not skip the stabilizer step. It is the invisible foundation of every professional embroidery project.
For printable mockups and digital product previews, the vector files in EPS and SVG format are excellent. You can scale the design without quality loss, place it onto product templates, and create sharp listing images. The clean lines of the retro lettering photograph well, and the groovy aesthetic draws attention in thumbnail views. Use that to your advantage when building Etsy listings or social media posts.
At the end of the day, Lifes Tough Get a Helmet earns its place in an embroidery designer's collection. It offers a mood, a shape, and a sentiment that translate well across multiple product types. The retro, wavy, groovy personality is on-trend without being a passing fad. Stitch it clean, place it thoughtfully, and let the design do the talking. Your customers will hear it loud and clear.