Have a Holly Xmas Jolly Christmas Embroidery Review
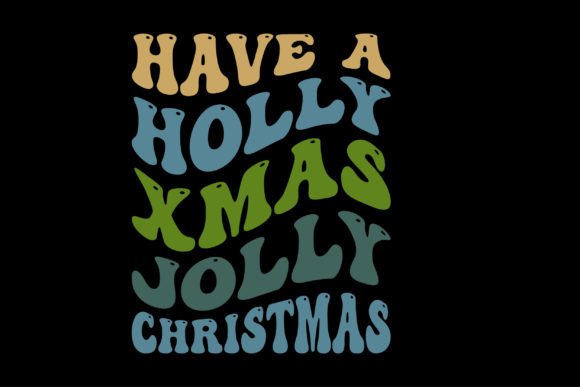
I was handed a fun holiday project recently: a set of custom embroidered tote bags for a local craft fair, and the client wanted a design that felt nostalgic but not corny. They gave me the file for Have a Holly Xmas Jolly Christmas, a retro, wavy, groovy graphic that immediately caught my eye. As an embroidery designer, I’m always looking for artwork that can translate into stitches without losing its personality, and this one had me curious. The file came as an EPS download, which is a vector format, so I knew I could scale it perfectly for digitizing. This review is about what happens when you take a print-ready graphic like this and turn it into a real, touchable embroidery product.
First Impressions and Retro Charm
Opening the zip file, I found a clean, single EPS file ready to use. The design is a playful typography piece with a distinctly groovy, almost 70s-inspired wave. The letters aren’t stiff; they dance across the baseline, and the overall mood is cheerful, slightly irreverent, and perfect for a modern Christmas aesthetic. It’s not your typical script or serif holiday greeting. Have a Holly Xmas Jolly Christmas feels like something you’d find on a vintage sweatshirt, but with a crispness that works for today’s handmade market. For embroidery, the bold, chunky lettering is a strong starting point—it promises good stitch coverage and visual impact, even from a distance.
From Graphic to Stitch: Digitizing the Wavy Look
Since this is a T-Shirt Designs graphic, not a pre-digitized embroidery file, the first step is digitizing. I imported the EPS into my digitizing software and started tracing. The wavy, uneven letter shapes are what give the design its soul, but they also require careful planning. I used a combination of satin stitch for the main letter widths and fill stitch for the thicker, rounded sections. The curves meant I had to manually adjust stitch angles to avoid puckering and keep the flow natural. If you’re new to digitizing, this is a good design to learn on because the shapes are forgiving—slight imperfections in the digitizing won’t ruin the retro vibe, but you still need to keep the stitch density consistent. I set the pull compensation a bit higher than usual because the wavy text can pull off-axis on stretchy fabrics.
Best Products for This Design
In my experience, Have a Holly Xmas Jolly Christmas shines on medium to large flat surfaces. A canvas tote bag is an ideal canvas—the wide, open area lets the full wave of the text breathe. I also tested it on a unisex crewneck sweatshirt, and the bold lettering looked fantastic across the chest, especially with a contrasting thread color like bright red on heather gray. For smaller items, you’ll need to scale wisely. The design fits nicely on a 5x7 hoop but can be resized for a 4x4 hoop if you’re careful with the smaller details like the ornamental dots or serifs. I wouldn’t shrink it below 3.5 inches wide, or the wavy lines might start to blur in the stitch. It’s a natural for holiday pillows, tea towels, and even a patch sewn onto a denim jacket. For baby clothes, I’d be cautious—the thick lettering might feel too heavy on delicate onesies, but a simplified version on a soft bib could work.
Fabric and Stabilizer Smarts
When I stitched the design on a tote bag, I used a medium-weight cutaway stabilizer and a water-soluble topping to keep the stitches from sinking into the textured canvas. The groovy letters have some dense areas, and without proper support, you’ll get puckering. For a sweatshirt, I used a no-show mesh cutaway and found that the design held up nicely after washing, provided the thread tension was right. Dark fabrics are a joy with this design—the thick, bold stems of the text pop with a contrasting thread, but you’ll want to test a few color combos. I tried a mint green thread on a navy blue tote, and it gave the whole thing a fresh, unexpected holiday look. On stretchy fabrics, I recommend a fusible stabilizer to prevent distortion, especially around the wavy baseline.
Real-World Challenges and How to Solve Them
No design is flawless, and Have a Holly Xmas Jolly Christmas has a few quirks when you take it to the machine. The wavy effect means the letter bottoms aren’t all on the same line, which can make alignment tricky if you’re adding it to a shirt with a pocket or a curved cap. For caps, I’d recommend placing the design on the side or back, not the front, because the curve of the cap can distort the wave. Small details like the internal cutouts in some letters need to be at least 1mm wide after digitizing to avoid thread breaks. I always run a test stitch on scrap fabric first, and I suggest doing a black and white printout or a digital mockup to check contrast before you commit to thread colors. One more thing: the design is intentionally retro, so if your thread colors are too muted, the vibe might get lost. I opted for a bold, slightly glossy polyester thread to keep that groovy energy.
Seasonal Selling and Commercial Use
If you’re an Etsy seller or craft business owner, Have a Holly Xmas Jolly Christmas is a smart addition to your holiday lineup. The retro style is trending, and it appeals to buyers who want something different from traditional script. I see it working beautifully on boutique totes, cozy sweatshirts, and even as a framed embroidery hoop art piece. The EPS file is a Graphics asset, so you can easily create matching mockups for your shop listings, which helps build a cohesive brand. Before you sell finished products, though, check the license terms. The listing says it’s a digital download with one EPS file, and typically these are meant for personal and commercial use in physical products, but you should confirm that you’re allowed to sell items with the design. I always keep a copy of the license in my project folder just in case.
Practical Tips for a Flawless Result
From my own stitching session, here’s a quick list of what made the difference between a good outcome and a great one:
- Test on scrap fabric—always do a sample run on the same fabric and stabilizer you’ll use for the final product.
- Check thread color contrast—bright, saturated threads bring out the playful personality; pastels can wash out the wavy energy.
- Review stitch density—the design has some thick and thin areas, so adjust the density in your digitizing software to avoid lumpy stitches.
- Confirm hoop size—the design fits comfortably in a 5x7 hoop, but if you scale down, double-check that all letter openings remain clear.
- Inspect small details—look at the tiny serif edges and internal cutouts; they need to be at least 1mm for clean stitching.
- Test in black and white—a quick monochrome print can reveal if the design will still read well on a dark background.
- Use proper stabilizer—cutaway for knits, tear-away for wovens, and always a topping if the fabric has a nap.
- Check licensing—even though it’s a digital download, ensure you have the right to use it on items you sell.
Who Should Grab This Design?
I’d recommend Have a Holly Xmas Jolly Christmas to embroidery designers, small shop owners, and crafters who are comfortable with basic digitizing or have access to a digitizing service. It’s not a plug-and-stitch embroidery file, but the EPS source gives you enormous flexibility. You can resize, recolor, and even modify the wavy text to fit your product line. For a hobbyist, it’s a fun weekend project; for a commercial decorator, it’s a trendy, sellable design that stands out at craft fairs and online. The retro, groovy mood is a breath of fresh air in a market flooded with cookie-cutter holiday motifs. It’s a design that will make your customers smile and have them reaching for their wallets—and isn’t that the whole point of a good handmade product?